
Tutorial: Intarsia
- Barbara Prime
- Jan 1, 2021
- 4 min read
Intarsia is a knitting technique that creates blocks of colour within a piece of knitted fabric. While it may look like an advanced technique, the steps involved are easy to learn. With some practice, you will be capable of knitting a variety of interesting and colourful projects! I use this technique to create contrasting markings on many of my animal toy designs, so I thought it would be useful to share how I work intarsia colour changes on a particular toy.
The piece of knitting shown in the tutorial is the head from my Tiger pattern. Before beginning Step 1, work Rows 1-19 of the piece. You will want to prepare two balls of your white yarn before beginning the intarsia section. Or, you can use opposite ends of a single ball of yarn.
Step 1: To add a new colour at the end of the row (white, in the photo below), fold the new yarn to make a loop, about 10 cm (4") from the end. Insert your right-hand needle to make the first stitch, and place the loop over the end of the needle. Knit this loop as your first stitch. (At the end of a row, the 2 yarn ends can be tied later to stop them from coming loose)

Step 2: Here I've worked the first section in white, and now I want to change to orange. I add the new colour yarn in the same way as described in Step 1. You want to make sure you leave a long enough end on the wrong-side that it will not come loose as you knit, and so you have to enough to weave in when you're done.

Step 3: I've now worked the middle section in orange, and I want to begin another section of white. You need to use a separate piece of yarn, because you are not carrying the white along behind the orange section.

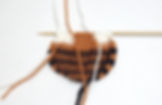
In the photo below, I've finished Row 20, and you can see the three sections of colour. (The loose yarn ends are hidden behind, and you see the three I am working with).

Step 4: I've begun Row 21, working the first white section. When I come to the place where I need to change yarn colours, I lay the first yarn (marked with blue dots) over top of the yarn I need next (marked with green dots). This way, when I pick up the orange yarn to purl the next stitch, the two yarns are twisted together. This prevents holes in the fabric as you change colours.

Step 5: I've worked the orange section of Row 21, and now I'm changing to white again. You can see where the orange yarn I just used (marked with green dots) is twisted with the yarn I'm using to make the next stitch (marked with blue dots).

Step 6: I've finished Row 21, and worked Row 22. This photo shows Row 23, where I am changing from white to orange. You can see how the two colours were twisted together in previous rows. This makes a seam between the two sections of colour. Practice will help you maintain an even tension as you change colours.

In the photo below I have completed the 6 rows of the intarsia sections. The right side looks even and tidy. If your stitches are not quite even, you can try gently pulling on the them with your needle tip, to smooth out the tension over the row. Blocking will also help. If it is very uneven, it is worth a little extra time to redo it, and get some more practice. (I did this a lot while I was learning!)

Here is the head from the wrong side. You can see more clearly now where the two yarn colours are twisted together.
In this photo, I've worked the last row of the head, cut the yarn, and threaded the end through the stitches to gather them together. It's looking a little more like the tiger's head now.

Step 7: Before you can finish the head, you need to weave in the yarn ends from the intarsia sections. If done incorrectly, you will get holes or visible stitches on the right side. A good way to start is to make a short stitch to the side of your yarn end, in the direction of the next colour. Check on the right side, to make sure any holes have been closed.

Step 8: Then weave in the yarn end securely, using your preferred method. I like to thread the end along a row of purl stitch bumps, working towards the side of the piece. Then I can tie them off as I sew the seam. Another method I use is to weave the yarn end in by following the existing stitches, so it won't show on the right side.

Now you can attach safety eyes or buttons, sew up the seam, and stuff the head. Some other tutorials that might be useful: soft sculpture to give the face more character, and how to embroider the nose and mouth.
Here is what the finished toy will look like! This simple technique is how I work intarsia on my toys. I hope you've found this tutorial useful, and that you feel motivated to try something new! If you want more help with this technique, there are many video tutorials by other knitting designers. An online search for "intarsia knitting" should find something that works for you.
