
Free Pattern: Snow Mouse
- Barbara Prime
- Nov 27, 2023
- 5 min read
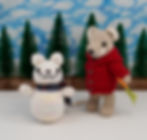
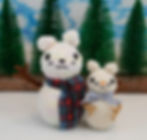
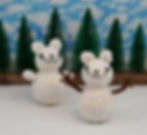
Knit a sweet little snow mouse from this easy and free pattern! You can make one in an evening, for a quick gift or decoration. Adjust the size of your creation by simply changing your yarn weight and needle size. The snow mouse looks great in a plain white yarn, but is also fun to knit from a textured or sparkly yarn. The yarn used for the smaller size was Knit Pick's Palette yarn, in Cream and Doe. The yarn used for the medium size was Loops & Threads Flecks, in the soft rainbow colour. There are two arm options available, depending on your available materials, desired look, and skill level. I hope you will enjoy this new design, and share your finished projects!

Snow Mouse
Materials for Small: 15 g of fingering weight yarn in white, 5 g of fingering weight yarn in brown (optional for stick arms), 1 m/yard of yarn in black, 1 m/yard of yarn in orange (optional), pair of 2.75 mm (US size 2) knitting needles, two 2.25 mm (US size 1) double-pointed needles (optional for stick arms), small stitch holder or safety pin, tapestry needle, pair of 8 mm black safety eyes, stuffing, 1 x 20 cm (⅜ x 8″) piece of fabric or ribbon for scarf
Materials for Medium: 30 g of worsted weight yarn in white, 10 g of worsted weight yarn in brown (optional for stick arms), 1 m/yard of yarn in black, 1 m/yard of yarn in orange (optional), pair of 4 mm (US size 6) knitting needles, two 3.75 mm (US size 5) double-pointed needles (optional for stick arms), small stitch holder or safety pin, tapestry needle, pair of 10.5 mm black safety eyes, stuffing, 2.5 x 25 cm (1 x 10″) piece of fabric or ribbon for scarf
Gauge for Small: 7 sts and 11 rows per 2.5 cm (1″) in stockinette
Gauge for Medium: 5 sts and 7 rows per 2.5 cm (1″) in stockinette
Size Small: 11 cm (4 ⅜″) tall, including ears
Size Medium: 18 cm (7″) tall, including ears
Notes
Use a long-tail, or similar, cast on. Leaving a 20 cm (8”) yarn end when casting on will give you a convenient length of yarn for seaming.
Use mattress stitch to sew seams, and whip stitch to attach pieces together.
To secure yarn ends on the toy pieces, weave the yarn ends through the body 2–3 times, then trim off any excess yarn.
Body and Head
Begin at bottom. CO 11 sts with white yarn.
Row 1: Purl.
Row 2: K1, [m1, k1] x 10. (21 sts)
Row 3: Purl.
Row 4: K1, [m1, k2] x 10. (31 sts)
Row 5: Purl.
Row 6: K1, [m1, k3] x 10. (41 sts)
Row 7-9: Work 3 rows in st st.
Row 10: K11, [m1, k10] x 3. (44 sts)
Row 11-23: Work 13 rows in st st.
Row 24: K1, [k4, k2tog] x 7, k1. (37 sts)
Row 25-27: Work 3 rows in st st.
Row 28: K1, [k3, k2tog] x 7, k1. (30 sts)
Row 29: Purl.
Row 30: K1, [k2tog] x 14, k1. (16 sts)
Row 31-33: Work 3 rows in st st.
Row 34: K2, [m1, k1] x 14. (30 sts)
Row 35: Purl.
Row 36: [K4, m1] x 2, k6, m1, k2, m1, k6, [m1, k4] x 2. (36 sts)
Row 37: Purl.
Row 38: K17, m1, k2, m1, k17. (38 sts)
Row 39: Purl.
Row 40: K18, m1, k2, m1, k18. (40 sts)
Row 41: Purl.
Row 42: K17, k2tog, k2, ssk, k17. (38 sts)
Row 43: Purl.
Row 44: K3, [k3, k2tog] x 3, k2, [ssk, k3] x 3, k3. (32 sts)
Row 45: P11, k1, p8, k1, p11.
Row 46-47: Work 2 rows in st st.
Row 48: K3, [k2, k2tog] x 3, k2, [ssk, k2] x 3, k3. (26 sts)
Row 49: Purl.
Row 50: [K1, k2tog] x 4, k2, [ssk, k1] x 4. (18 sts)
Row 51: Purl.
Row 52: [K2tog] x 4, k2, [ssk] x 4. (10 sts)
Cut yarn, thread end through remaining sts, and pull tight to gather.
Attach safety eyes below purl bumps on Row 45. Gather together cast-on sts, and sew partway up the back seam. Sew partway down from the top of the head. Stuff the toy: the shaping works best if you stuff the head and body as two separate balls, with just a little stuffing in the narrow “neck” section. Finish sewing the back seam, adding more stuffing if necessary. Secure the yarn ends.
If you’re not using safety eyes, embroider eyes with black yarn. Between the eyes, embroider a nose with black or orange yarn, making a small rectangle or triangle. Under the nose, embroider a mouth with the black yarn.
Ears (make 2)
Begin at base of ear. CO 12 sts with white yarn.
Row 1: Purl.
Row 2: K2, [m1, k2] x 5. (17 sts)
Row 3-5: Work 3 rows in st st.
Row 6: K1, [k1, k2tog] x 5, k1. (12 sts)
Row 7: Purl.
Row 8: [K2tog] x 6. (6 sts)
Cut yarn, thread end through remaining sts, and pull tight to gather. Sew the seam to the cast-on edge. Put a tiny bit of stuffing in each ear. Position the ears on top of the head, with the ear seams facing towards the back. Sew the ears to the head through both layers of the cast-on edge. Secure all yarn ends.
Snow Arms (make 2)
Begin at top of arm. CO 14 sts with white yarn.
Row 1-9: Beg with a WS row, work in st st.
Row 10: [K2tog] x 7. (7 sts)
Cut yarn, thread end through remaining sts, and pull tight to gather. Sew seam to the cast-on edge. Add a small amount of stuffing to the arms. Position the arms at the sides of the body, slightly below the neck, with the seams facing towards the back of the body. Sew the arms to the body through both layers of the cast-on edge. Secure all yarn ends.
Stick Arms (optional, make 2)
CO 4 sts with brown yarn and a DPN.
Rnd 1-13: Work as I-cord.
Rnd 14: [K1, m1, k1] x 2. (6 sts)
Rnd 15-16: Work as I-cord.
First Finger: K2, place other 4 sts onto stitch holder or safety pin. Work 4 rnds as I-cord. Pass first stitch over second, then cut yarn and pull end through last stitch to secure.
Second and Third Fingers: Place next 2 sts onto a DPN, attach yarn. Work 5 rnds as I cord. Pass first stitch over second, then cut yarn and pull end through last stitch to secure.
When all the fingers are done, thread the yarn ends down through each finger into the palm. Knot pairs of yarn ends together to secure them. Thread yarn ends part-way down inside arm (leaving out one end for sewing), then trim excess. Use the last end to make a couple stitches to hold the palm together between the fingers, making sure to hide all knots inside the palm. Thread this yarn end down through the arm. See Snow Arms instructions for attaching arms.
The other two toys shown in the photos are the Pocket Mouse, wearing the hooded cardigan, and the Mouse from Wee Wuzzies.
Abbreviations
[ ] x N = repeat sequence in brackets N times ("to end" means to repeat until the end of the row)
Beg = beginning
CO = cast on
K or k = knit
k2tog = decrease 1 by knitting 2 stitches together
m1 = increase 1 by picking up loop between stitch just worked and next stitch, with your left needle, from front to back, and knit into the back of this loop
P or p = purl
Rem = remaining
Rnd = round, or 1 row in circular knitting
RS = right side (knit in stockinette stitch)
ssk = decrease 1 by slipping 2 stitches purl-wise from left to right-hand needle, slip both stitches back to left-hand needle, then knit slipped stitches together
st or sts = stitch or stitches
st st = stockinette stitch, knit on Right Side and purl on Wrong Side
WS = wrong side (purled in stockinette stitch)